Integrating Files
With Invenio, you can attach files to records and use powerful REST APIs to upload and download files. You can also integrate previewers to nicely display the content of a file in a webpage and use APIs to deliver different types of images using the IIIF de facto standard.
Overview
The first step when setting up the files integration is to decide where
the files should be stored.
In Invenio, you can specify where files are stored by defining a
Location: a location is a representation of your storage system.
It can be, for example, a local folder in your machine or a remote storage.
It has a name and a URI to define the base path to the files.
To access and manage files in a location, Invenio uses a Storage implementation:
this defines how to access files in your location. In other words, it knows how files
are stored, e.g. in a hierarchy of folders, and how to read and write them.
You can define multiple locations and storage. This is useful, for example, when you are dealing with online and offline file systems.
A single specific file is represented in Invenio by a FileInstance object:
it defines its relative path to the Location where it is stored and also
other useful properties such as its size or checksum.
To sum up, you can think of the Location, Storage and FileInstance as the physical representation of your file system(s).
Object storage
Invenio provides an abstraction of your physical file system with an object storage representation similar to Amazon S3. This allows great flexibility and easy to use APIs.
You can compare this implementation to a traditional file system
where files are contained in folders. In Invenio object storage,
ObjectVersions are contained in Buckets.
Buckets are sets of objects, they are uniquely identified by an ID and can define constraints on file sizes or quotas. A bucket also defines the default Location to use when adding files, if none is provided.
An ObjectVersion is a specific version (the version_id) of a file
at a given moment in time. It has a reference to a FileInstance
and metadata such as the file name (the key). The latest version
of a file is marked as the head.
ObjectVersions allow to perform operations to your files without accessing the file system. Let’s see a common example: a user wants to delete a previously uploaded file. With Invenio, this means creating a new ObjectVersion for this file, the new head, without reference to the FileInstance that it had before. The file on disk is not accessed or removed. This is also called delete marker or soft deletion.
You can read more in the Invenio-Files-REST module documentation.
Integration with records
Invenio integrates files and records by creating a reference between a Record and a Bucket. By default in Invenio, a record has a reference to one bucket and a bucket to one record.
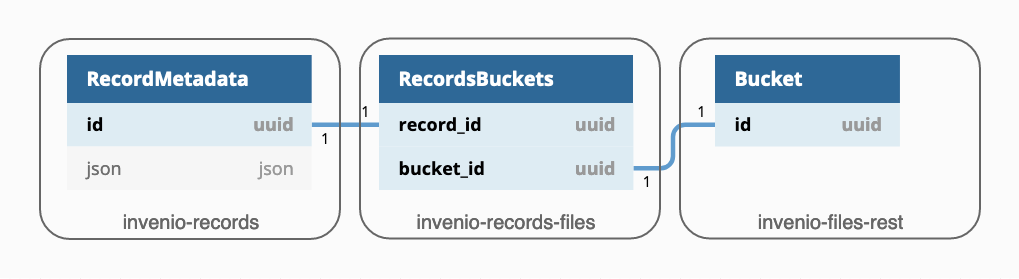
Invenio allows you to set up different scenarios and have, for example, multiple buckets per records and viceversa or buckets not attached to any record. To achieve any of these, you will have to define your own integration between records and files.
The records-files integration provides a set of REST APIs to easily add, retrieve or delete files for a given record.
Using REST APIs
If you haven’t already done so, make sure you’ve followed the Quickstart so you have an Invenio instance to work on.
Let’s create a simple record:
$ curl -k --header "Content-Type: application/json" \
    --request POST \
    --data '{"title":"Some title", "contributors": [{"name": "Doe, John"}]}' \
    https://127.0.0.1:5000/api/records/?prettyprint=1
Response:
{
  "created": "2019-11-25T15:02:24.379791+00:00",
  "id": "1",
  "links": {
    "files": "https://127.0.0.1:5000/api/records/1/files",
    "self": "https://127.0.0.1:5000/api/records/1"
  },
  "metadata": {
    "contributors": [
      {
        "name": "Doe, John"
      }
    ],
    "id": "1",
    "title": "Some title"
  },
  "revision": 0,
  "updated": "2019-11-25T15:02:24.379798+00:00"
}
You can now upload a file to this record (if you are not using the default scripts to run the server, make sure your celery worker is running):
$ echo "my file content" > my_file.txt

$ curl -k -H "Content-Type: application/octet-stream" \
    --request PUT \
    --data-binary @my_file.txt \
    https://127.0.0.1:5000/api/records/1/files/my_file.txt?prettyprint=1
Response:
{
  "is_head": true,
  "updated": "2019-11-25T15:21:07.276520",
  "size": 16,
  "version_id": "577a96b9-94a1-4abf-8f6a-a5c168ee6faa",
  "key": "my_file.txt",
  "tags": {},
  "links": {
    "self": "https://127.0.0.1:5000/api/records/1/files/my_file.txt",
    "version": "https://127.0.0.1:5000/api/records/1/files/my_file.txt?versionId=577a96b9-94a1-4abf-8f6a-a5c168ee6faa",
    "uploads": "https://127.0.0.1:5000/api/records/1/files/my_file.txt?uploads"
  },
  "mimetype": "text/plain",
  "created": "2019-11-25T15:21:07.269683",
  "delete_marker": false,
  "checksum": "md5:1b7ea8126d278ecbfa9fcb9b0d7dc5af"
}
If you now fetch the record again, you can see that the uploaded files have been added to its metadata:
$ curl -k --header "Content-Type: application/json" \
    https://localhost:5000/api/records/1?prettyprint=1
Response:
{
  "created": "2019-11-25T15:06:02.858325+00:00",
  "files": [
    {
      "bucket": "7ddc1409-35a3-4a65-8324-89da4245f2f9",
      "checksum": "md5:1b7ea8126d278ecbfa9fcb9b0d7dc5af",
      "file_id": "6f413750-82ca-45bb-aa5a-0f009b651843",
      "key": "my_file.txt",
      "size": 16,
      "version_id": "577a96b9-94a1-4abf-8f6a-a5c168ee6faa"
    }
  ],
  "id": "1",
  "links": {
    "files": "https://localhost:5000/api/records/1/files",
    "self": "https://localhost:5000/api/records/1"
  },
  "metadata": {
    "contributors": [
      {
        "name": "Doe, John"
      }
    ],
    "id": "1",
    "title": "Some title"
  },
  "revision": 2,
  "updated": "2019-11-25T15:21:07.453874+00:00"
}
You can download the file by requesting it with its filename:
$ curl -k --header "Content-Type: application/json" \
    https://localhost:5000/api/records/1/files/my_file.txt
You can also delete the uploaded file:
$ curl -k --header "Content-Type: application/json" \
    --request DELETE \
    https://localhost:5000/api/records/1/files/my_file.txt
Integration details
When creating a new record, Invenio automatically creates and assigns a new Bucket to the newly created record. Then, when a new file is uploaded to the record, Invenio will:
fetch the Bucket assigned to the Record
store the file in the bucket’s default Location using the configured Storage
create a new FileInstance with size, checksum and the URI path pointing to the file
create a new ObjectVersion with a reference to the FileInstance and the Bucket to which it belongs
update the record’s metadata to add the metadata of the new file
You can learn more on how record and files work together as well as the available APIs by reading the documentation of Invenio-Records-Files and Invenio-Files-REST.
Setup your storage
With the quickstart application, a default Location is set up in the same directory of your virtual environment.
You can create your own locations by using the CLI. The only
constraint is that you will always have to define at least
one default Location.
For example, you can define a new default location named shared in the path
/mnt/shared:
$ pipenv run invenio files location shared /mnt/shared --default
From now on, any new Bucket, besides the existing ones will use this location
and therefore files will be stored in /mnt/shared.
Invenio provides a default storage implementation based on
PyFilesystem and it will store files
in the path <location_uri>/<file instance uuid>/data.
The middle path <file instance uuid> can be adjusted via configuration
variables.
For example, the previously uploaded file my_file.txt will be saved on
disk in /mnt/shared/4j/0f/k7ss-h8k1-0k2h/data.
Note
Every file in Invenio is stored on disk with the file name
data. This is to avoid any possible issue with user input and
potentially unsupported special characters. The original file name is
stored in the ObjectVersion metadata and this internal implementation
is never exposed to the user.
Custom storage
The default storage implementation in Invenio uses PyFilesystem to access the file system. If this does not fulfill your requirements, you can implement your own.
The invenio_files_rest.storage.FileStorage is the base class
interface that defines the operations used when accessing files.
You can create your own factory that will instantiate and return your
storage implementation.
def my_storage_factory(fileinstance=None, default_location=None,
                       default_storage_class=None,
                       filestorage_class=MyFileStorage, fileurl=None,
                       size=None, modified=None, clean_dir=True):
    fileurl = fileinstance.uri
    return filestorage_class(
        fileurl, size=size, modified=modified, clean_dir=clean_dir)
Then, you can configure Invenio to use this new storage
by setting the related configuration variable in your config.py:
FILES_REST_STORAGE_FACTORY = "my_storage_factory"
If you are looking for an integration with a S3 object storage, you can read more about it on the Invenio-S3 documentation.
Permissions
Files permissions relies on Invenio-Access to allow configured users or roles to perform actions. These concepts are also described in the Managing access to records section.
The integration with records does not set any particular permission on files: it is your responsibility to decide how to give access to files based on your record.
The first step is to implement your own permission factory. As an example,
let’s implement a factory that allows access to files only to the user that
is owner of the record (the record should have a field owner).
from flask_principal import UserNeed
from invenio_access import Permission, superuser_access
from invenio_files_rest.models import Bucket, MultipartObject, ObjectVersion
from invenio_records import Record
from invenio_records_files.models import RecordsBuckets

def my_permission_factory(obj, action):
    """Given an action, return the permission for the given object.

    :param obj: An instance of :class:`invenio_files_rest.models.Bucket` or
        :class:`invenio_files_rest.models.ObjectVersion` or
        :class:`invenio_files_rest.models.MultipartObject` or ``None`` if
        the action is global.
    :param action: The required action.
    :raises RuntimeError: If the object is unknown.
    :returns: A :class:`invenio_access.permissions.Permission` instance.
    """
    # apply the same permission to any `action`
    # retrieve the bucket from the requested `obj`
    bucket_id = None
    if isinstance(obj, Bucket):
        bucket_id = str(obj.id)
    elif isinstance(obj, ObjectVersion) or isinstance(obj, MultipartObject):
        bucket_id = str(obj.bucket_id)

    if bucket_id is not None:
        # retrieve the record with this bucket attached
        # we assume that there is only one
        record_bucket = RecordsBuckets.query.filter_by(bucket_id=bucket_id).one_or_none()
        if record_bucket is not None:
            # retrieve the owner field
            record = Record.get_record(record_bucket.record_id)
            owner = record.get("owner")
            if owner:
                return Permission(UserNeed(record["owner"]))
    # allow only admins
    return Permission(superuser_access)
Then, configure Invenio to use this function when validating permissions by
setting the related configuration variable in config.py:
FILES_REST_PERMISSION_FACTORY = "my_permission_factory"
Response codes
If the authorization for an action fails, Invenio will normally returns
a 403 response code for authenticated users, 401 otherwise.
For security reasons, when trying to retrieve an unauthorized file,
it will return a 404 instead to hide the existence or non-existence
of the file.
Large files upload
When trying to upload a large file, it might happen that your HTTP
request aborts and returns a response code
413 (Request Entity Too Large). The maximum upload size
is limited by the default configuration of Flask and most probably
your web server.
You can adjust these configurations according to your needs.
For Flask, set the MAX_CONTENT_LENGTH configuration variable.
Be aware that if the request does not specify a CONTENT_LENGTH,
no data will be read.
$ app.config['MAX_CONTENT_LENGTH'] = 25 * 1024 * 1024 # bytes
Here an example to tune the configuration of Nginx.
In case you use another web server, please consult its documentation.
http {
 ...
 client_max_body_size 25M;
}
Files integrity checks
To ensure that files in your file system are not damaged, it is recommended to set up files integrity checks. This consists in a periodical tasks that scan your files and re-compute each checksum by comparing it with the one calculated when uploaded. In case of mismatch, it will throw an exception.
Configure the task in your config.py:
CELERY_BEAT_SCHEDULE = {
    'file-checks': {
       'task': 'invenio_files_rest.tasks.schedule_checksum_verification',
       'schedule': timedelta(hours=1),
    }
}
Make sure that celery beat is running:
$ celery -A invenio_app.celery beat
When the task schedule_checksum_verification runs, it will retrieve a number of files to check based on a set of constraints in order to throttle the execution rate of the checks. For each file, it will then spawn the task verify_checksum to calculate the checksum.
Given that this task will constantly check files, it is recommended to schedule these tasks on a separate low priority queue.
Create a new queue called low in your config.py:
CELERY_TASK_ROUTES = {
    'invenio_files_rest.tasks.verify_checksum': {'queue': 'low'},
}
Then, spawn only one worker that will consume tasks sent to the low queue:
$ celery -A invenio_app.celery worker -l info -Q low
Previewing files
Invenio has support for previewing many of the most popular file formats including PDF, ZIP, Markdown, images and Jupyter Notebooks.
Given an ObjectVersion with a filename (the key field), Invenio will
iterate through the available previewers and use the first matching the
file extension contained in the filename. The ordered list of previewers
can be configured via the configuration variable
PREVIEWER_PREFERENCE.
For example, given a thesis.pdf to preview and the following
configuration:
PREVIEWER_PREFERENCE = [
    "simple_image",  # previews .jpg and .png
    "a_pdf_previewer",  # previews .pdf
    "another_pdf_previewer",  # previews .pdf
]
only the a_pdf_previewer will be run as previewer.
another_pdf_previewer will be never executed.
To preview a file in your website, you can use the available
endpoint /records/<pid_value>/preview/<filename> and the
view invenio_previewer.views:preview.
In your config.py add:
RECORDS_UI_ENDPOINTS=dict(
    recid_previewer=dict(
        pid_type='recid',
        route='/records/<pid_value>/preview/<filename>',
        view_imp='invenio_previewer.views:preview',
        record_class='invenio_records_files.api:Record',
    ),
)
You see the list of available previewer and learn how to create your own previewer by reading the documentation of Invenio-Previewer.
Handling images using IIIF
Invenio implements the IIIF Image APIs, a de facto standard for delivering images on the web. It allows you to generate thumbnails, resize, zoom and preview images.
For example, you can resize on the fly images uploaded by the user to a dimension that best suites your website layout. This is very useful, for example, when displaying thumbnails in the list of search results.
Let’s say that you want to resize the large image large.png
uploaded by the user to 640x480 pixels.
You can use the available REST APIs and retrieve
the image as the following:
# IIIF Image specification:                 /region/size/rotation/quality.format
/api/iiif/<bucket_id>:<version_id>:large.png/full/640,480/0/default.png
Let’s say that you now want to achieve the same when previewing the image in your website, and not via REST APIs. You can take advantage of the files preview and integrate IIIF with it.
Add the IIIF previewer iiif_image in your config.py:
PREVIEWER_PREFERENCE = [
    'iiif_image',
    'pdfjs',
    'zip',
]
and configure if to resize to your needs. In config.py:
IIIF_PREVIEWER_PARAMS = {
    'size': '640,480'
}
To learn more about the IIIF integration, see the Invenio-IIIF documentation.
Security
When serving files, you will have to take into account any security implication. Here you can find some recommendations to mitigate possible vulnerabilities, such as Cross-Site Scripting (XSS):
If possible, serve user uploaded files from a separate domain (not a subdomain).
By default, Invenio-Files-REST sets some response headers to prevent the browser from rendering and executing HTML files. For files that you consider safe and you need to have rendered, you can configure the MIMETYPE_WHITELIST. See send_stream for more information.
Prefer file download instead of allowing the browser to preview any file, by adding the
?downloadURL query argument.
Next steps
You can have detailed information by reading the documentation of each module:
